TopBanner

Showing posts with label MicrosoftTeamsUserTip. Show all posts

Microsoft Teams User tip #28: How Does a Teams Recording Handle Switching Between Webcams?


One of the things I've noticed using Microsoft Teams recording is that the recording will not necessary look or sound exactly like what the meeting organizer saw.

One of the items I noticed today is around switching webcams. When you switch between webcams you will can a momentary blank/black screen. By momentary, I should clarifying that this actually can take some time. Then the new webcam will start presenting.

The interesting thing is that the recording handles this slightly different. In recording the webcam image will freeze until the next camera starts.

In my opinion its really nice that you can switch between webcams so easily using native Microsoft Teams switching capability. In normal scenarios switching between webcams only happens to those with way too much hardware plugged into their PCs, but its good to know what effect switching will have on a recording.

If you want the switching on the recording to happen more smoothly, take a look at using OBS Studio  & webcam driver.

Microsoft Teams User Tip #27: Hover Over Back to Get 1 Click Access to Previous Locations


Am I the last to notice this feature? You can now hover over the Back button on Microsoft Teams PC client and get a 1 Click quick access to recent places you visited in Teams.

Nice!

Merry Christmas!

Microsoft Teams User Tip #26: How to Access the Microsoft Teams Extended Diagnostics Menu via the Tray Icon


Some of my fellow Landis Technologies team members (Ken & CJ)  just alerted me to a very helpful diagnostics menu on Microsoft Teams that I was not familiar with.

To access it, go to the Teams tray icon:


  • Left click on the Microsoft Teams Windows tray icon 5 times
  • Then right click

Now you should see this menu:


I'd love to hear your feedback on what you most like about the menu.

To see my other Microsoft Teams User Tips: http://windowspbx.blogspot.com/search/label/MicrosoftTeamsUserTip

Microsoft Teams User Tip #25: Blur My Background

Now that Microsoft Teams video blur is GA, go ahead and use it! After you have a video meeting going…click More Actions | Blur my background

image

Without blue my background

image

On

image

I love this elegantly simple feature.

To see more Microsoft Teams User Tips:
http://windowspbx.blogspot.com/search/label/MicrosoftTeamsUserTip

.[Video] Learn Microsoft Teams in 5 Minutes:
http://windowspbx.blogspot.com/2016/11/learning-microsoft-teams-in-5-minutes.html

Microsoft Teams User Tip #24: Steps to Setup a Free Microsoft Teams Account & How It Works

Below is the process to setup a free Microsoft Teams account starting with a Gmail account.

A few things before we start that you are probably wondering:

  • Setting up a user from http://office.com/teamsfree will essentially setup a new Microsoft Teams org and the user as admin
  • There is new UI in Microsoft Teams for this user to add new users to the org
  • Yes, you can use gmail accounts


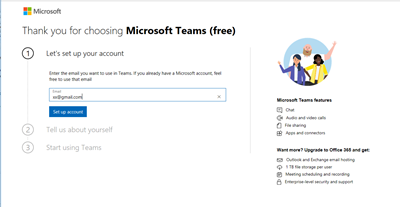
Go to http://office.com/teamsfree. Click sign up for free account.

Now type in email address & “Set up account”

image

Create Account

image

next

image

next

image

next

image

next


image

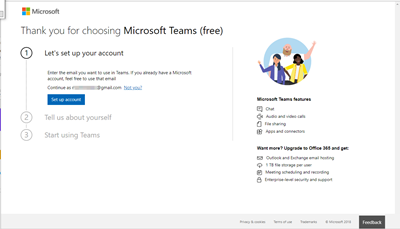
Click “Set up account”

image

Create account

image

next

image

next

image

Now the account is setup.

Next we will tell Microsoft about this user.

image

next

image

next

image

next

image

next

Run Microsoft Teams for 1st Time and select org.

(for me it seemed to list Teams tenants that had invited this email address.)

image

(a popup to re-enter my username [email address])

image

Now you can invite more people to join your org

image

How to manage your Teams org:

image

Conclusion

I was impressed by the smoothness of setting up a new Microsoft Teams organization with an non Microsoft email address. The built in administration is very simple.

Microsoft Teams User Tip #23: Quickly Get Microsoft Teams Ring & Version (Works with App or Browser)


How to determine Microsoft Teams Ring you are on (from Browser or Teams App):

  1. Press Ctrl + Alt + Shift + 1
  2. Open the “MSTeam Diagnostics Log…” file that is created.
    1. On Browser it will be easy to open directly from Browser
    2. On MS Teams App open from “%userprofile%\Downloads\MSTeams Diagnostics Log*” (On Win10 click Start & just type %userprofile%\Downloads)
  3. Look at section of file near the top that looks like this: "ring": {     "id": "ring4"
    1. 4
    2. 3 (TAP)
    3. 1.5 (IT)


That’s all.

To see more Microsoft Teams User Tips:
http://windowspbx.blogspot.com/search/label/MicrosoftTeamsUserTip

.[Video] Learn Microsoft Teams in 5 Minutes:
http://windowspbx.blogspot.com/2016/11/learning-microsoft-teams-in-5-minutes.html

Microsoft Teams User Tip #22: Quickly Create a Folder & Copy Files to It from Multiple Mobile Devices

The Challenge

What should be easier than creating a folder in a Team and copying multiple files to it from various Mobile devices? At the moment this is stymied by several Microsoft Teams limitations:

  • Users cannot copy a file directly from a mobile device to a specific Teams Folder using the Teams mobile app
  • Users cannot select several files at once to upload to a conversation. User need to select each file, then wait (a considerable time till it uploads for a typical Android photo file), then select the next. No user will do this…

So how can users achieve this?

This process will essentially require a desktop Teams client to get started, then mobile users can contribute.

1 - Create a file folder in a team using Microsoft Teams on a PC.

2 - Now open this folder using Sharepoint (Open in Sharepoint) to get the Sharepoint URL.

image

3 - Next, copy the Sharepoint URL into a Conversation in this team labeled something like “Link to efficiently upload file to this folder”

4 – Now on Mobiles and PC’s users can click on the Sharepoint URL and efficiently send multiple files to this Teams folder.

5 – On the mobile devices click on the Sharepoint URL | “…” | Upload | Files | and now select the multiple files to be uploaded…


To see more Microsoft Teams User Tips:
http://windowspbx.blogspot.com/search/label/MicrosoftTeamsUserTip

.[Video] Learn Microsoft Teams in 5 Minutes:
http://windowspbx.blogspot.com/2016/11/learning-microsoft-teams-in-5-minutes.html

Microsoft Teams User Tip #21: Using Desktop Sharing Give Control

image

In this Microsoft Teams user tip we will take a look at the new Desktop Sharing Give Control functionality.

Sharing Your Desktop

You click on Share Desktop and then select a Screen if you have more than 1.

image

Now the screen you just shared will have a red border indicating its shared.

Give Control – Hover, Top, Center.

To give control to another user in the meeting you may need to hover in the center top of the shared screen to get the control. (For me, sometimes the Give Control panel doesn’t show on initial sharing, as shown below)

image

Hover center top to get the control

image

That’s it.

image

Request Control – Lower, Left

Of course, another user in the call can request control, The button is in the lower left of the video canvas.

image


Neat New Feature – 2 Mouse Pointers: Local Mouse and Controller Mouse

A nice surprise is that Microsoft Teams Desktop sharing has two mouse pointers:

  • The user sharing their own screen has a mouse pointer
  • The user controlling the screen at this time has a mouse pointer

The user who is not currently controlling the screen has a black mouse pointer [2 in screenshot] and the user actively controlling the screen has a normal pointer. [1 in screenshot below]

image

By a single click in the shared screen the local user and user given control can toggle who has active control of the mouse at the moment.

Screen Sharing Lag Indication

There is a small amount of lag, but Microsoft Teams shows this by allowing the remote mouse to trail your local mouse. This is my opinion nicely indicates what is happening in a natural way.

image

Conclusion

I think Desktop Sharing Control has been nicely implemented and will be a welcome features to all users!

To see more Microsoft Teams User Tips:
http://windowspbx.blogspot.com/search/label/MicrosoftTeamsUserTip

.[Video] Learn Microsoft Teams in 5 Minutes:
http://windowspbx.blogspot.com/2016/11/learning-microsoft-teams-in-5-minutes.html

Microsoft Teams User Tip #20: How to Grab a Screenshot of Shared Content without Navigation & Button Overlap?

Meeting attendees regularly want to do a screenshot of meeting shared content. Two items that can be on top of the content you want to screenshot is the menu on the left of the Microsoft Teams client and the call controls. (shown below). In this short article we will give the steps to get rid of these two items quickly.

image

The call controls

image


To get rid of the meeting content partially being behind the navigation menu on the right of the Teams client and get rid of the call controls, just right click twice in black area outside the red border around the meeting content.

Just right click twice in black area outside the red border around the meeting content.

image


Now you can use OneNote clipping (Windows + Shift + S) or your favorite screenshot app (I used Greenshot)

To see more Microsoft Teams User Tips:
http://windowspbx.blogspot.com/search/label/MicrosoftTeamsUserTip

.[Video] Learn Microsoft Teams in 5 Minutes:
http://windowspbx.blogspot.com/2016/11/learning-microsoft-teams-in-5-minutes.html

Microsoft Teams User Tip #19: Teams SnapChat Feature: Skype for Business IM’s Disappear After a Period of Time

image

It appears like Skype for Business instant messages entirely disappear after a certain amount of time. (appears like 24hrs to me, but thats a rough estimate)

Take a looks in Chats after 24hrs, and presto, Gone!


image

So, just be aware, if you use Teams to Skype for Business IM Chats, they will not be saved or searchable in Teams. (Teams makes this clear). Also, they entirely disappear like a SnapChat photo!

Winking smile

Microsoft Teams User Tips #18: Keep Multiple Microsoft Teams Accounts / Tenants Open Simultaneously

image

Several things conspire to make it ideal to be able to keep multiple Microsoft Teams Accounts/Tenants open simultaneously. Unfortunately, just opening several Browser windows and switching to the appropriate Accounts/Tenants doesn’t seem to work since all the browsers switch to the same Account/Tenant.

But we can achieve this using Chrome “People” feature. Essentially Chrome People seems to make separate browser sessions, which allows us to stay in multiple separate Accounts/Tenants.

Let’s get going…

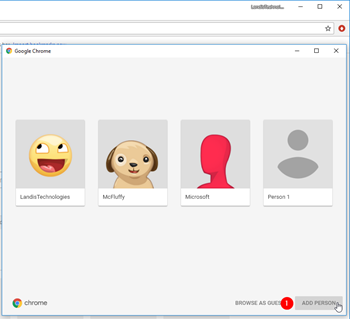
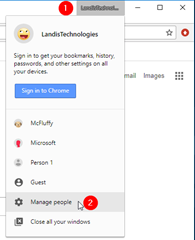
Using Chrome, click on the “People” button beside the Minimize/Maximize/Close button in the upper right of Chrome.
image

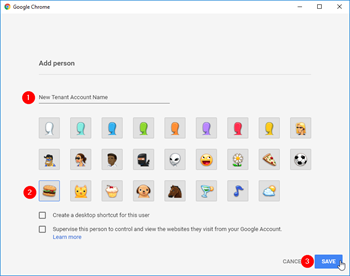
Add Person

image

Type in a Name (to identify the Account/Tenant). Assign an avatar to identify it in your task bar if you wish.
image

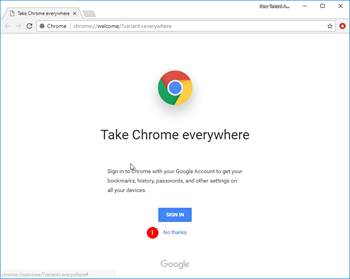
No need to create additional Google Account, “No Thanks”
image

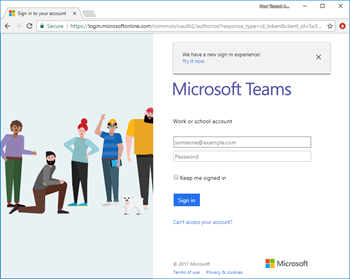
Now sign into Microsoft Teams

image

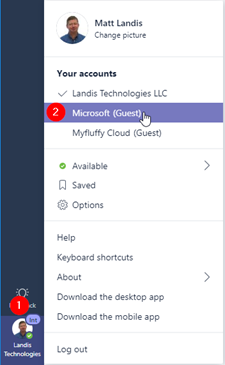
And switch to the Account/Tenant you want this “Person”/Session to show.

Repeat this for each Guest Accounts/Tenants you interact with regularly and you should be able to interact with all the Guest Accounts instantly.

How to Have this Session (Person) StartUp in Correct Account/Tenant

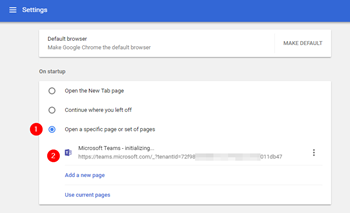
Now we want to assign this “Person” (Account/Tenant browser sesssion) an URL that opens the correct tenant.

An Account/Tenant URL like like this.
https://teams.microsoft.com/_?tenantId=72f988bf-86f1-41af-91ab-2d7cd011db47

When you switch between Accounts/Tenants in Microsoft Teams this URL is shown briefly and you can copy it. We want to copy this URL and make it the default startup web page for this Session.

So let’s switch the Account/Tenant we want to work with. Do this in Teams:
image

Now copy that URL…

image

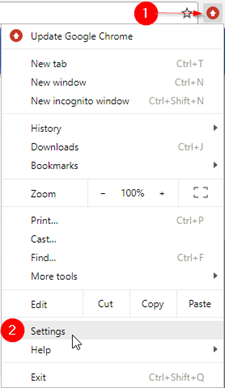
Now go to Chrome, then Customize & Control Chrome | Settings |
image

Go to On startup | Open a specific page or set of pages | Add a new page | and copy the URL we got above.
image


Summary

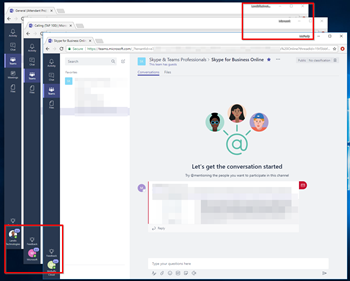
Now you can stay in in multiple Accounts/Tenants simultaneously.
image

What this solution does:

  • Be in multiple Accounts/Tenants at the same time
  • Keep Presence (roughly) Correct.

What this solution does not (yet) do:

  • Automatically sign-in using correct credentials
  • Allow users to make audio/video calls
  • Windows are not tabs in one browser
  • etc.

If you have any ideas on how to make this solution even better, please comment!


To see more Microsoft Teams User Tips:
http://windowspbx.blogspot.com/search/label/MicrosoftTeamsUserTip

.[Video] Learn Microsoft Teams in 5 Minutes:
http://windowspbx.blogspot.com/2016/11/learning-microsoft-teams-in-5-minutes.html